Skip to content
assostro-header-logo
assistro
  • Integrations
    • Zapier
    • Shopify
    • HubSpot
    • WordPress
    • Chrome Extension
    • Metro Accounting (Coming soon)
    • Flavor CRM (Coming soon)
  • Learn
    • Blog
    • Developer Guide
    • User Guide
    • Tutorial
  • Pricing
  • Contact Us
  • Get Started
Get Started

Extension

3
  • Define your own template to send schedule message
  • Send Message at a scheduled time using SyncMate
  • Bulk messaging at a scheduled time using SyncMate

Other

6
  • How to use SyncMate in a 3rd Party application via OAuth – The Secure way
  • Assistro Dashboard
  • After Installation : Setting up SyncMate Chrome Extension
  • Getting Started with SyncMate and Shopify Integration: A Step-by-Step Guide
  • SyncMate User Guide: Regenerating Your Token
  • How to back up your WhatsApp chats in HubSpot?

SyncMate

9
  • How to Connect your WhatsApp with SyncMate?
  • Connect your Custom App with SyncMate
  • Connect your WooCommerce App with SyncMate
  • Connect your Contact Form 7 App with SyncMate
  • Troubleshooting and Reconnection Guide
  • How to use SyncMate X Shopify Application ?
  • How to send automated WhatsApp messages on Google Calendar events?
  • How to fetch WhatsApp Group ID – Guide to Fetch Group ID with Video
  • How to fetch WhatsApp Channel or Newsletter ID – Guide to Fetch Channel or Newsletter ID with Video

Developer Guide

2
  • Connect your Custom App with SyncMate
  • SyncMate User Guide: Regenerating Your Token

Tutorial

2
  • SyncMate Introduction Video
  • Use WhatsApp API with Custom applications using SyncMate

HubSpot

9
  • Connect your HubSpot App with SyncMate
  • How to Save a WhatsApp Contact to HubSpot Using SyncMate?
  • How to create a Deal for a WhatsApp Contact in HubSpot via SyncMate?
  • How to Create a Note for a WhatsApp Contact in HubSpot using SyncMate?
  • How to Create a Task for a WhatsApp Contact in HubSpot using SyncMate?
  • How to Create a Ticket for a WhatsApp Contact in HubSpot through SyncMate?
  • How to Create a Log for a WhatsApp Contact in HubSpot through SyncMate?
  • How to Back Up and associate Your Contacts’ Data in HubSpot?
  • An Onboarding Guide for Hubspot Via SyncMate

Zapier

4
  • How to fetch WhatsApp Group ID – Guide to Fetch Group ID with Video
  • How to connect Zapier with SyncMate?
  • How to send a WhatsApp notification to any individual?
  • How to send a WhatsApp Notifictaion to any group or channel?
View Categories
  • Home
  • user-guide
  • Zapier
  • How to connect Zapier with SyncMate?

How to connect Zapier with SyncMate?

1 min read

To connect your Zapier account with SyncMate, you have to follow these steps:

Step 1: Open your account. #

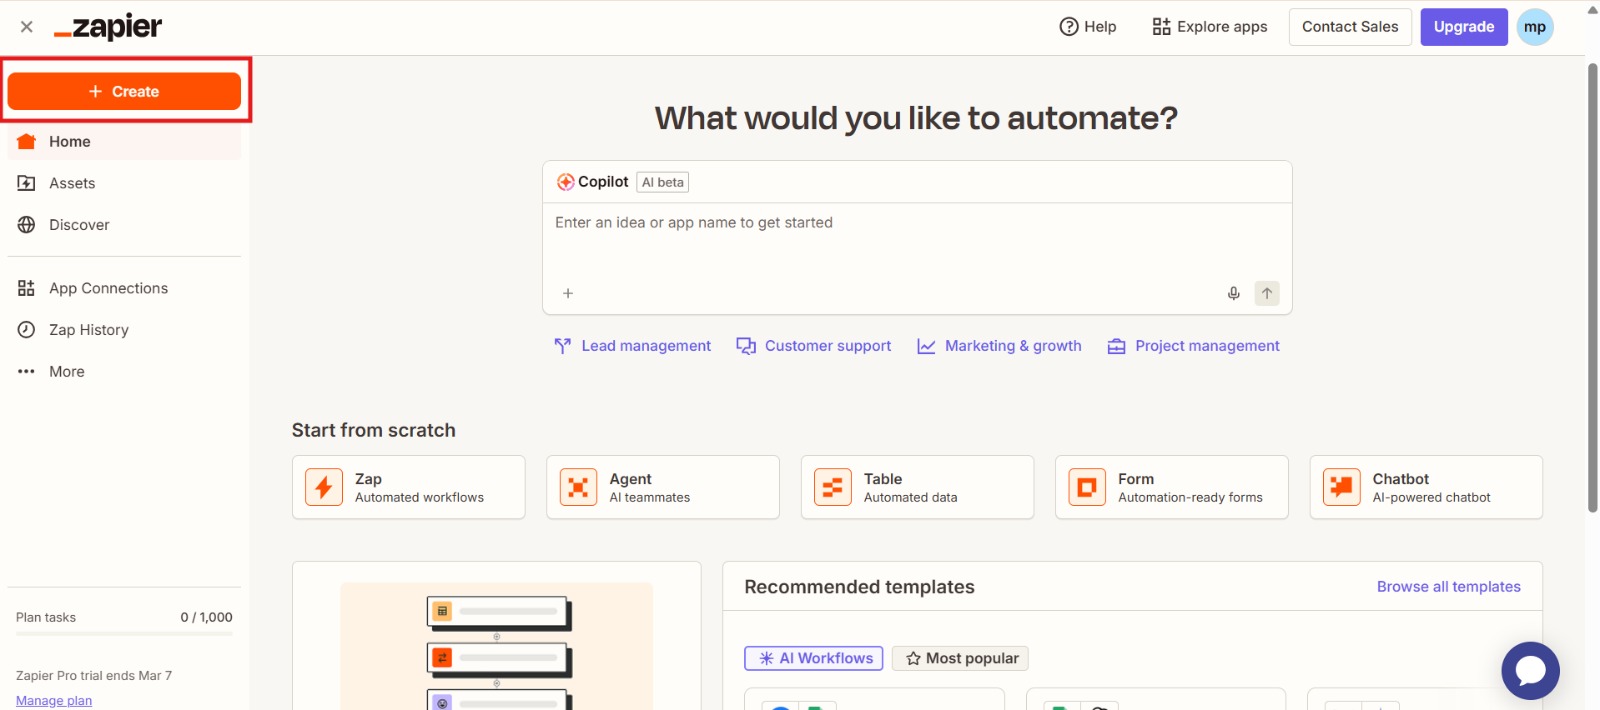
Firstly, open your Zapier account. In the top left corner, you’ll get an orange color “Create” (plus sign) icon. Select it.

Step 2: Select Zaps. #

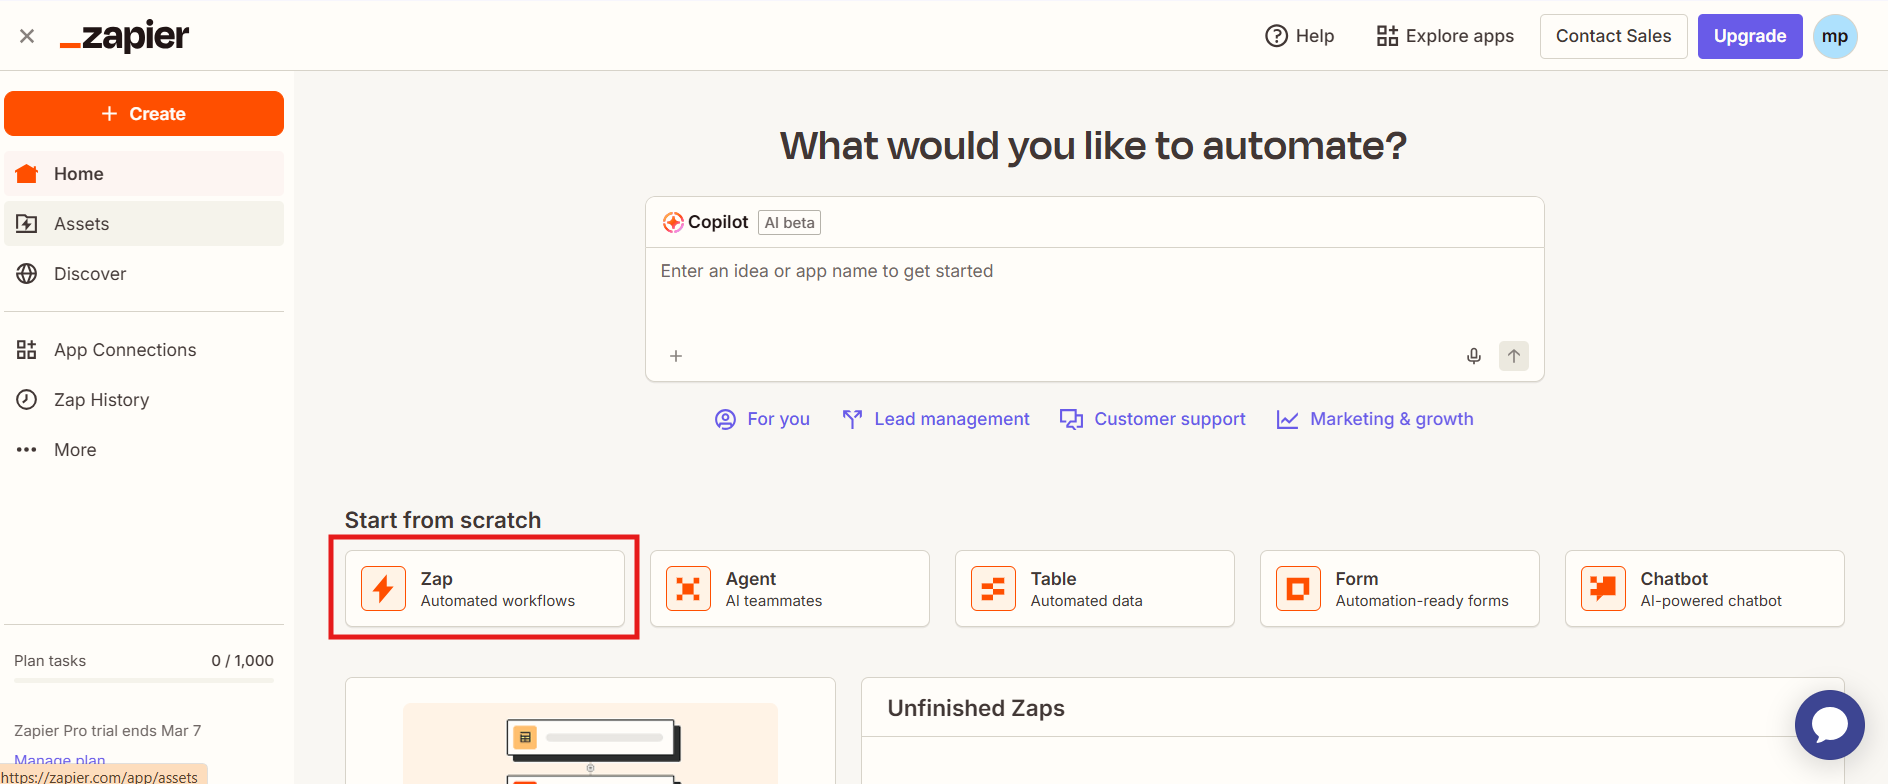
Now, a list will appear; select Zap in the list.

Step 3: Create a trigger. #

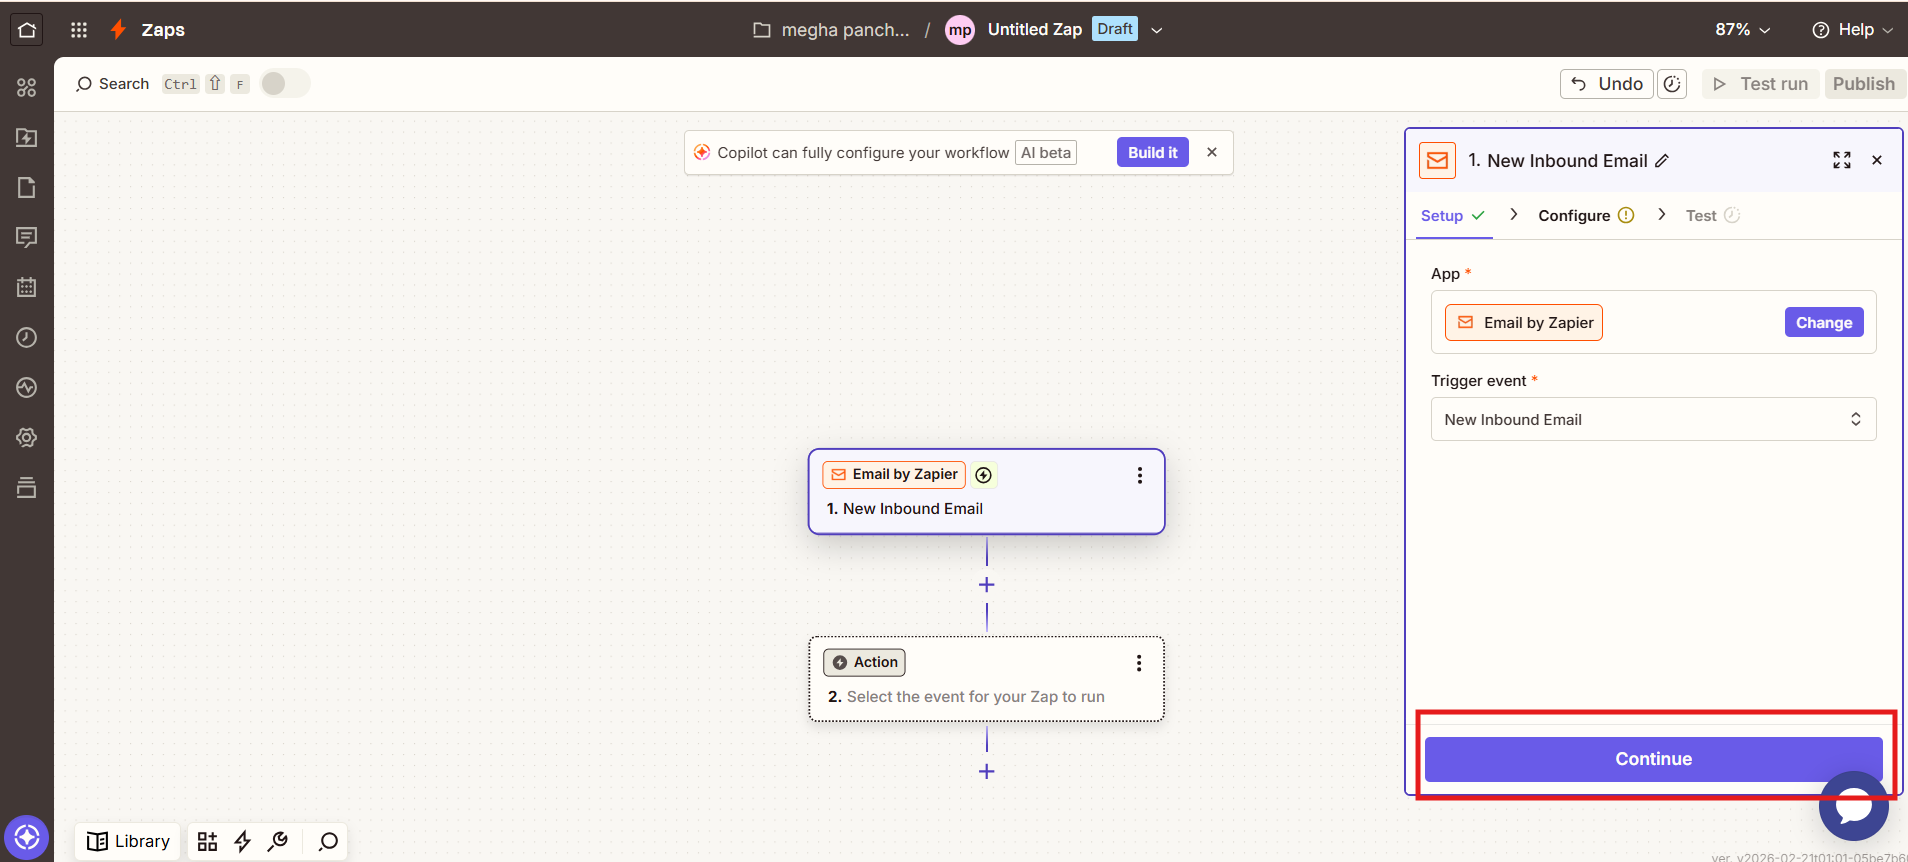
Select the trigger, complete the form by filling in the mandatory fields. Click on continue.

Step 4: Test Trigger  #

Now, by clicking “Test trigger”, test the trigger you have created. Then, click “continue with selected record”.

Step 5: Search for “SyncMate.”  #

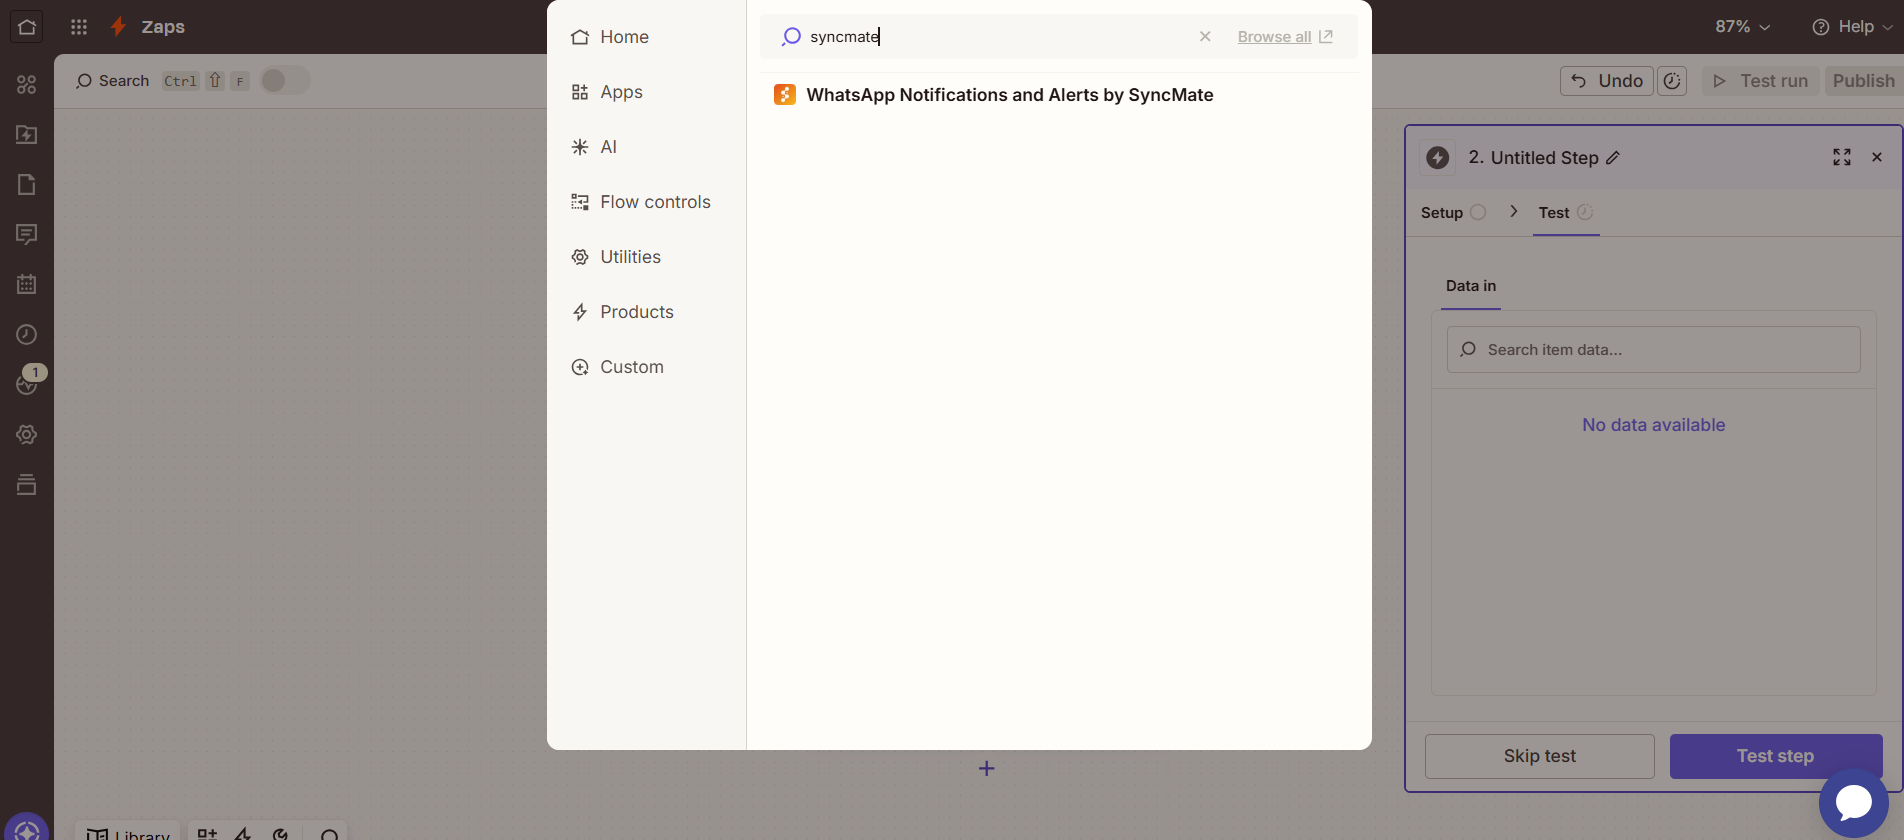
You’ll get a search bar. Search for “SyncMate” and click on the “WhatsApp Notification and alerts by SyncMate”.

Step 6: Fill in the fields. #

Now, fill the mandatory fields, and in the account field, you’ll get the “Sign in” button.

Step 7: Sign in  #

Create an account on Assistro. 

Step 8: Connect your WhatsApp account. #

Connect your WhatsApp with Assistro by following our connection guide.

Step 9: Activate Zapier. #

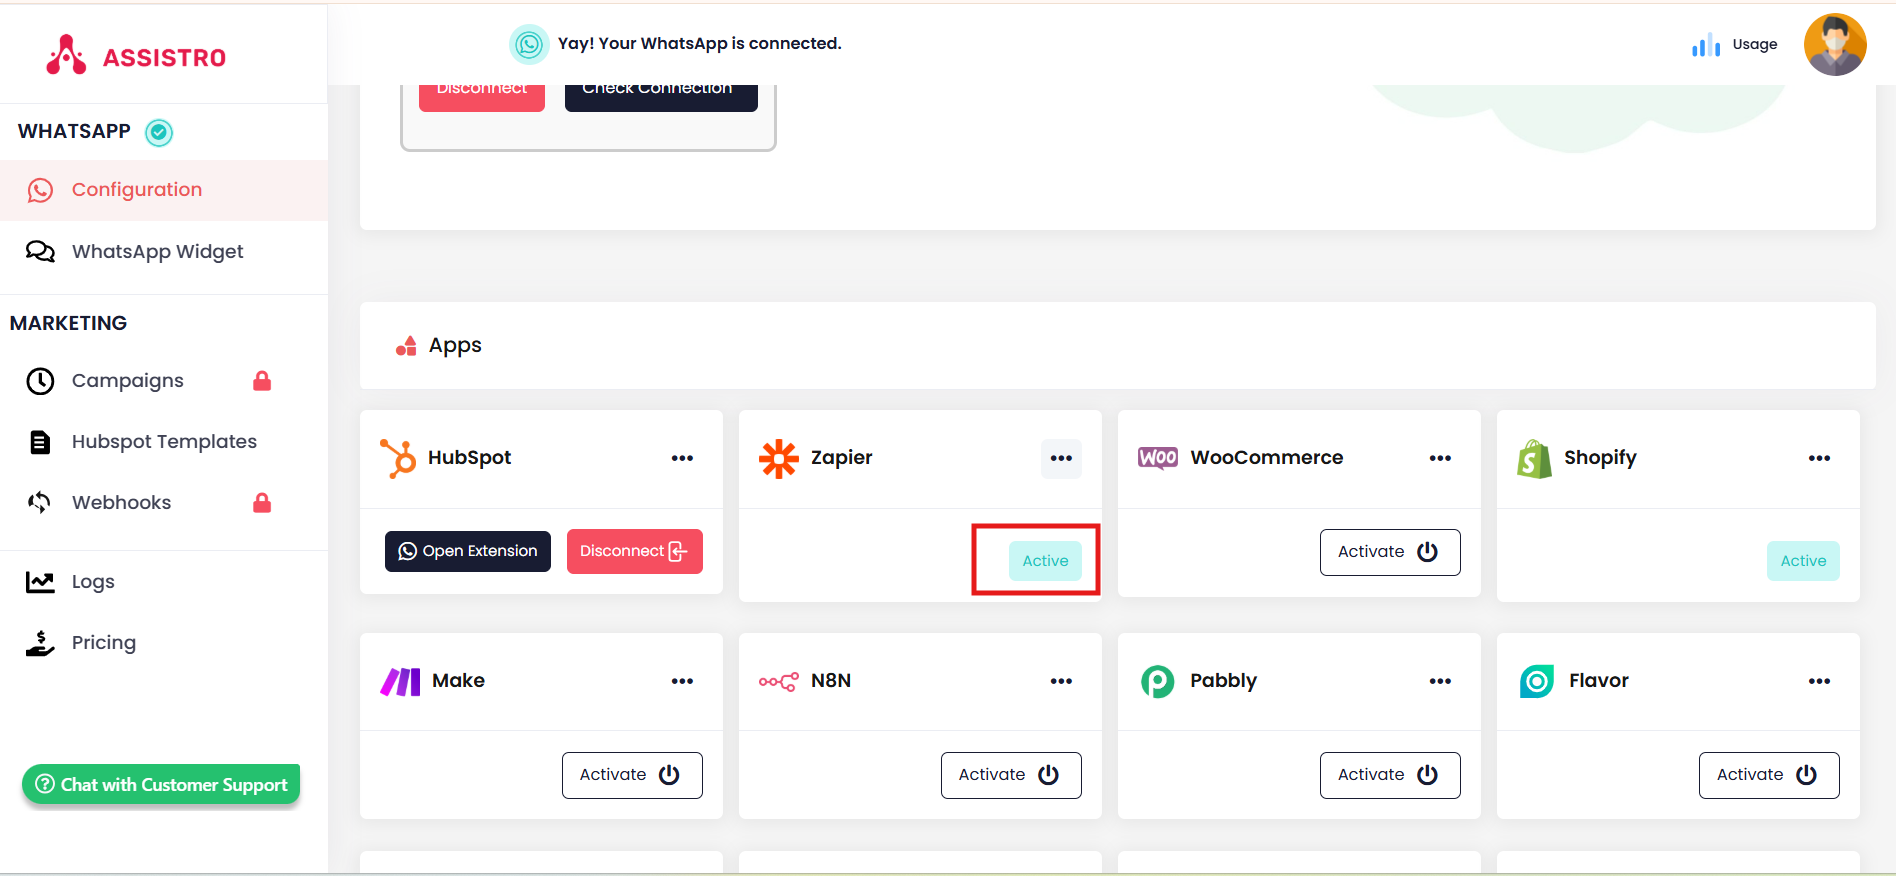
Now, click on the “Activate” button in the Zapier section.

Step 10: Access Assistro’s account to Zapier. #

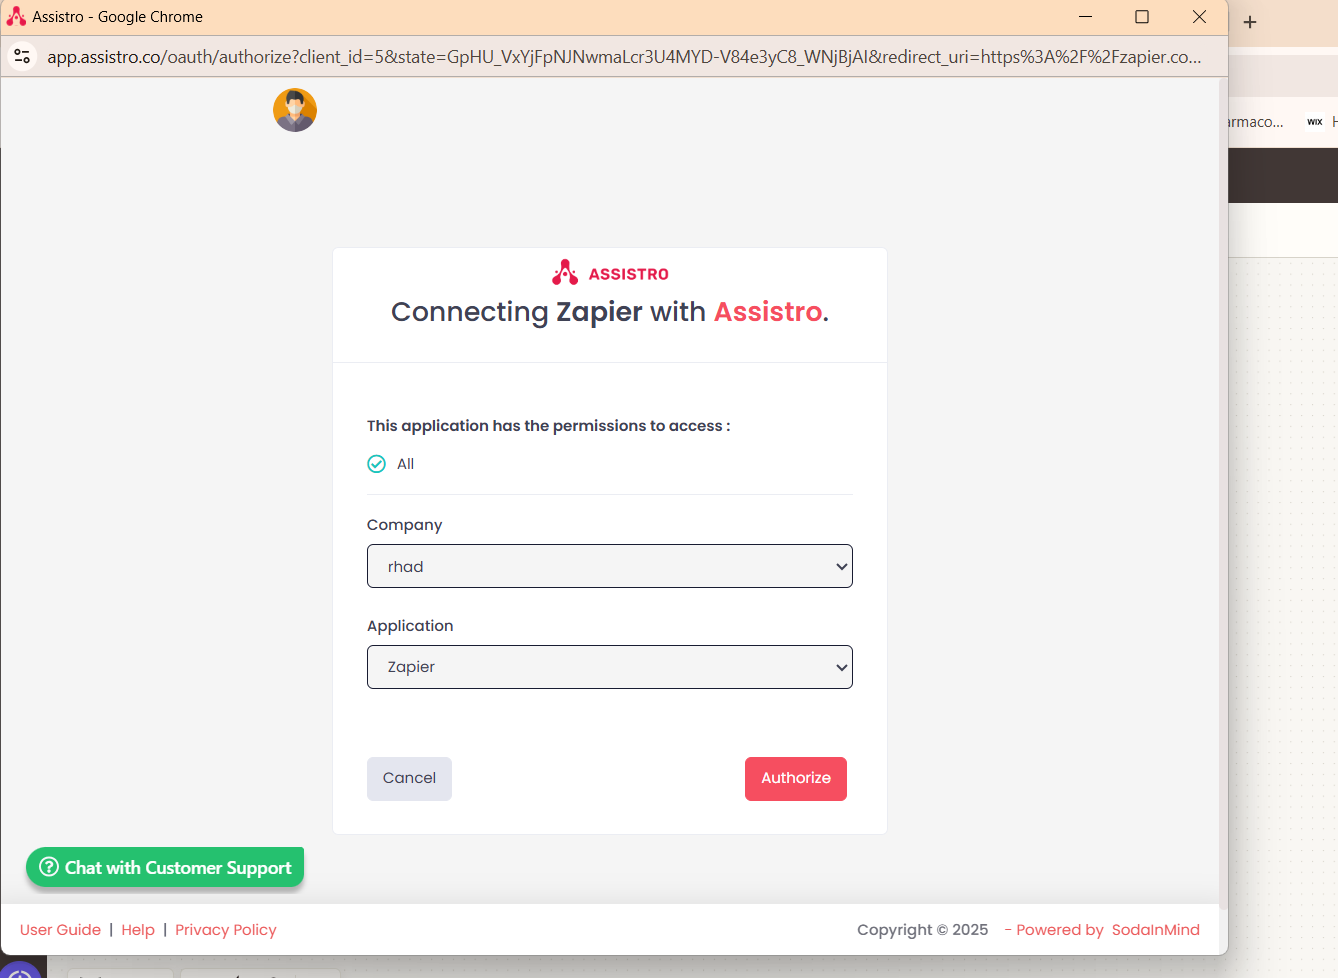
Go back to Zapier, then create your action by accessing your Assistro’s account and clicking on the “Continue” button.

Step 11: Fetch phone number or group ID. #

Follow our guide to fetch the phone number or group ID.

Step 12: Fill mandatory fields. #

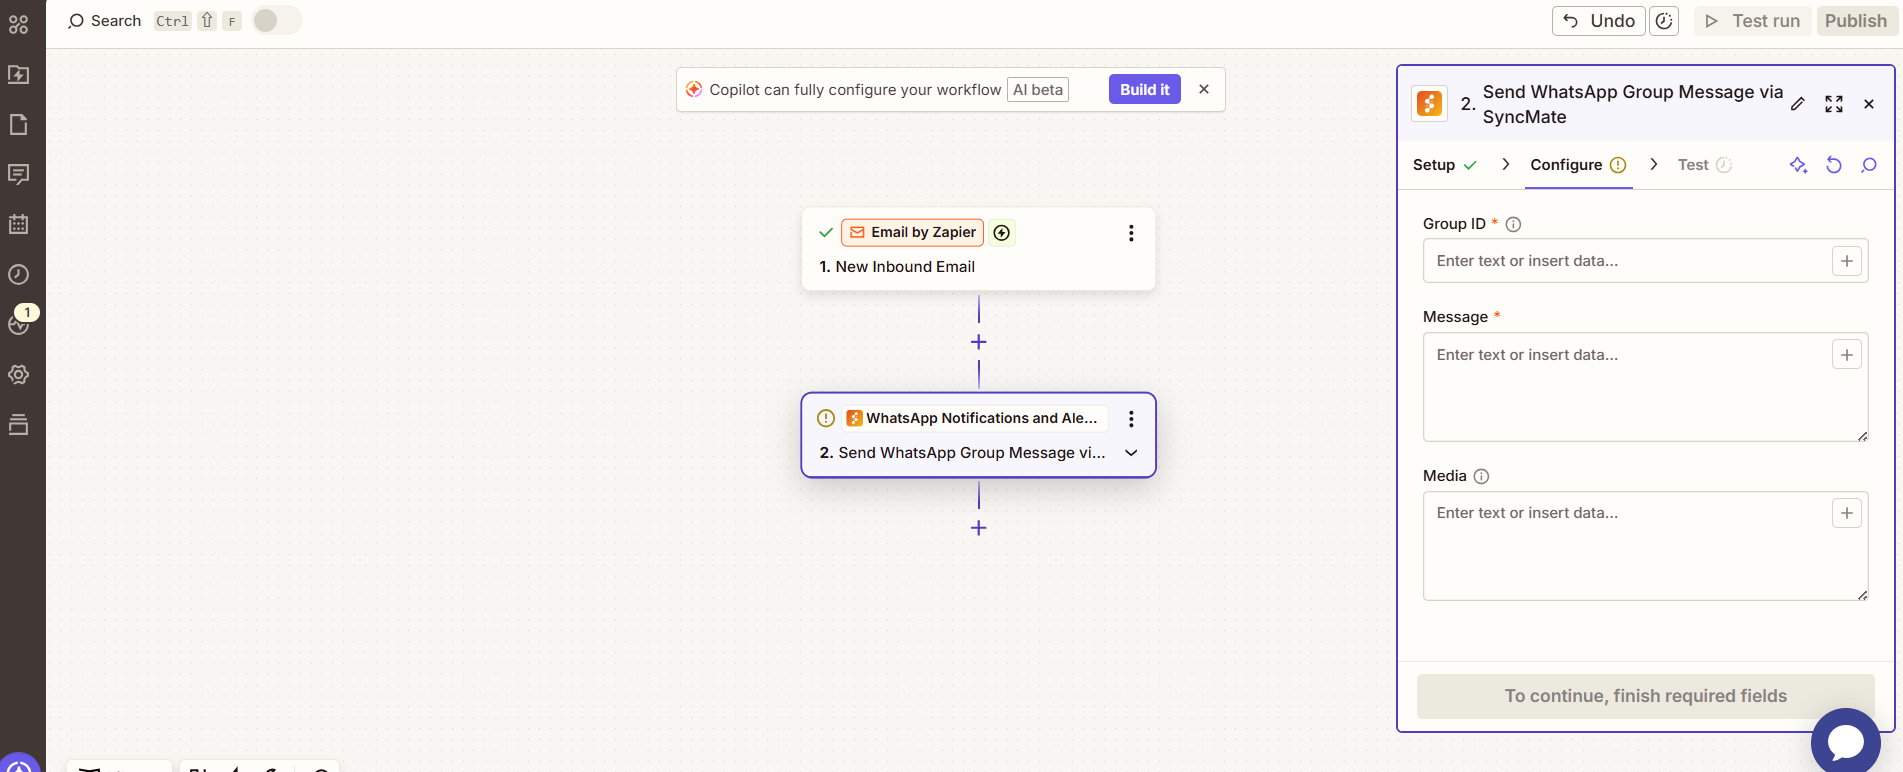
Now, fill in the mandatory fields to complete the action.
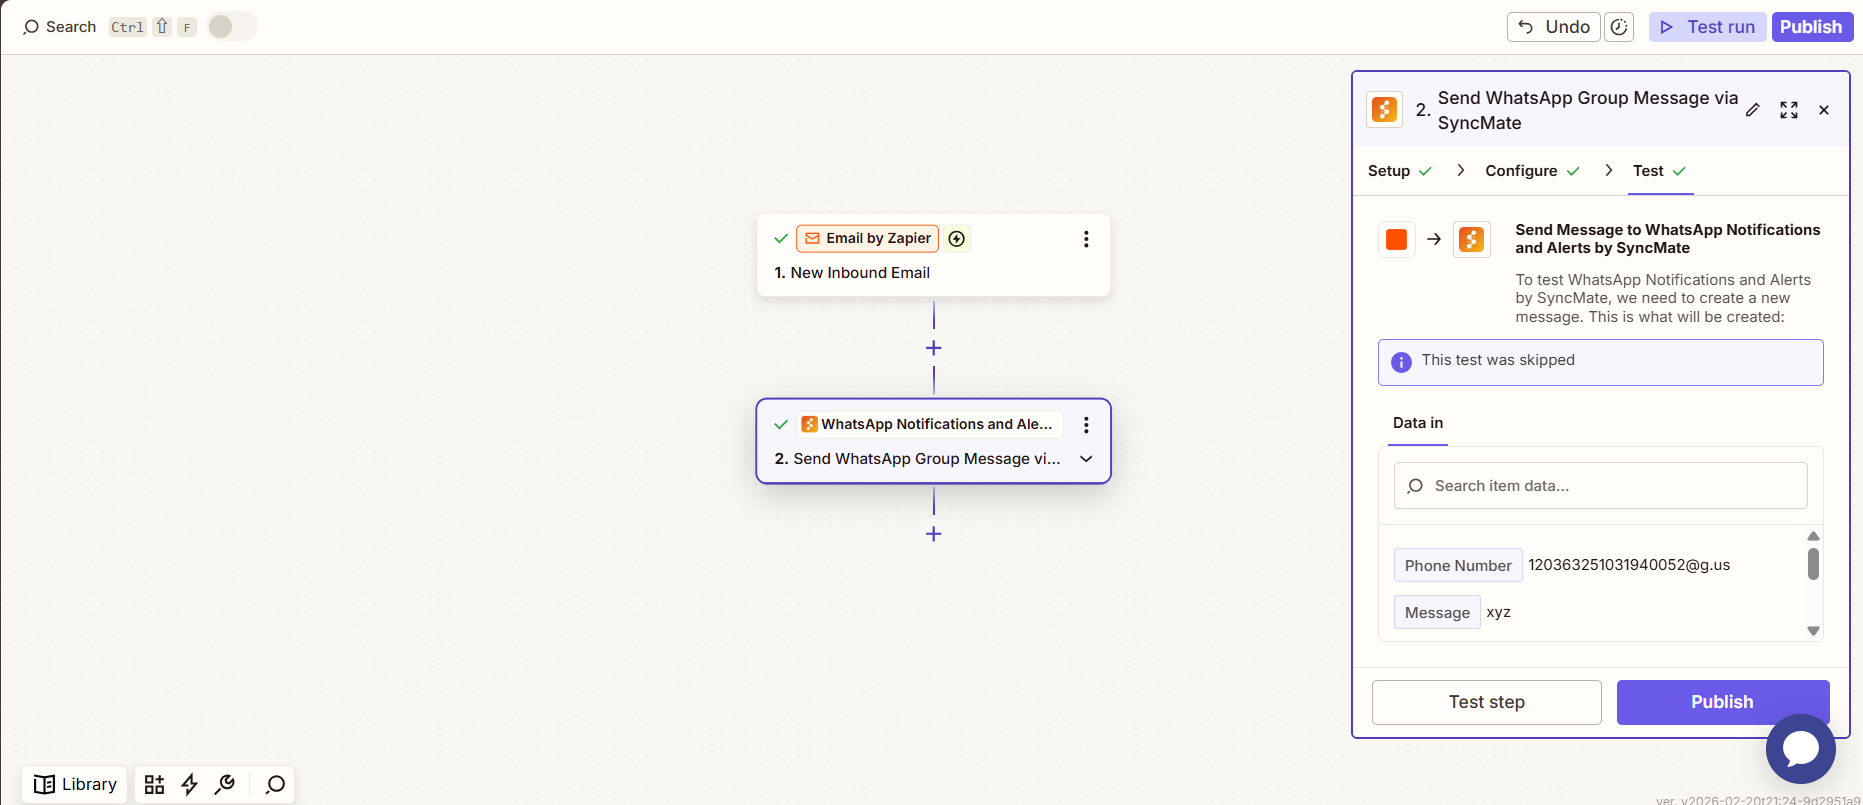
Step 13: Test Step. #

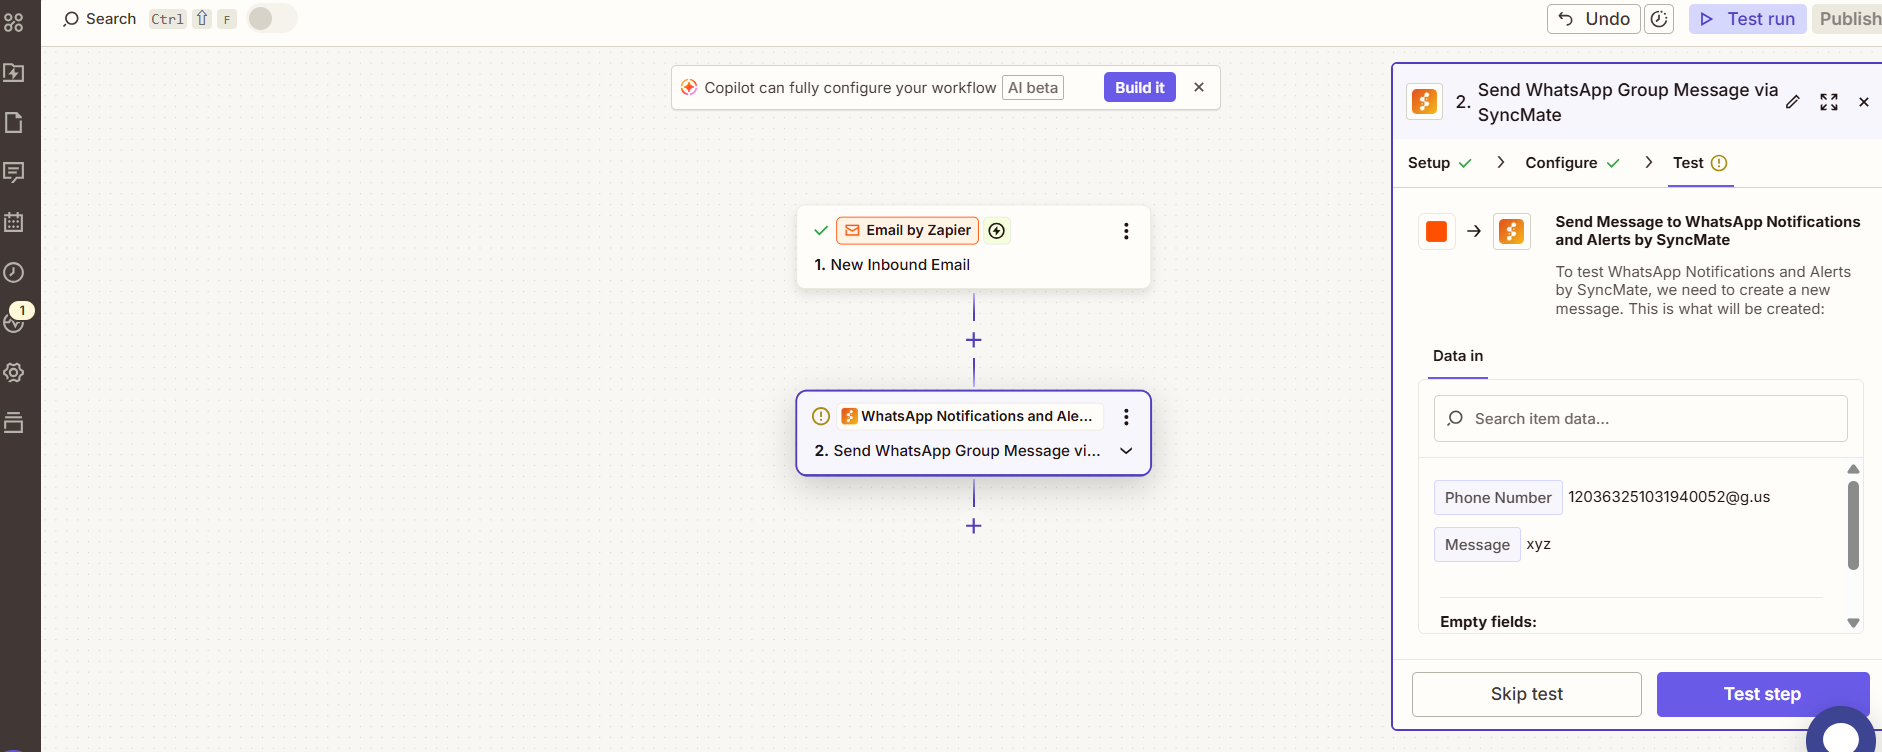
Test the steps you performed earlier.

Step 14: Publish  #

Now, publish the zap and you’ll see your zap is successfully working.

Updated on September 17, 2025

What are your Feelings

  • Happy
  • Normal
  • Sad
Share This Article :
  • Facebook
  • X
  • LinkedIn
  • Pinterest
How to fetch WhatsApp Group ID – Guide to Fetch Group ID with VideoHow to send a WhatsApp notification to any individual?
Table of Contents
  • Step 1: Open your account.
  • Step 2: Select Zaps.
  • Step 3: Create a trigger.
  • Step 4: Test Trigger 
  • Step 5: Search for “SyncMate.” 
  • Step 6: Fill in the fields.
  • Step 7: Sign in 
  • Step 8: Connect your WhatsApp account.
  • Step 9: Activate Zapier.
  • Step 10: Access Assistro’s account to Zapier.
  • Step 11: Fetch phone number or group ID.
  • Step 12: Fill mandatory fields.
  • Step 13: Test Step.
  • Step 14: Publish 
assistro

We’re your innovation partner, delivering cutting-edge solutions that elevate your business to the next level.


    Navigation

    • Integrations
    • Pricing
    • Contact Us

    Integrations

    • Zapier
    • Shopify
    • HubSpot
    • Wordpress
    • Chrome Extension
    • Metro Accounting [Coming soon]
    • Flavor CRM [Coming soon]

    Learn 

    • Blogs
    • Developers
    • User Guide
    • Tutorials

    © Copyright 2025, All Rights Reserved by Assistro